How Do You Get Scratches Out of Hardwood Floors?
Scratches on hardwood floors are a common worry, and understanding how to get scratches out of hardwood floors can help you keep them looking their best for years to come. Whether it’s a light scuff from everyday life or a deeper mark from moving furniture, these imperfections don’t have to be permanent. With the right care and approach, you can restore your floor’s natural beauty and feel confident maintaining it over time.
This guide explains practical methods for recognising the type of scratch you have and repairing it properly, so you can feel confident caring for your floor.
1. Assess the Scratch
The first step is to inspect the scratch closely. Not all scratches are the same, and choosing the right fix depends on understanding its depth.
- Light/surface scratches usually only in the finish. These are common in high-traffic areas or under chairs and can often be treated easily.
- Moderate scratches go deeper into the wood itself, needing a bit more work to blend them in.
- Deep gouges might remove some of the wood or leave visible dents, requiring filling or, in some cases, professional help and a plank replacement.
Understanding the depth ensures you choose the most effective repair approach without risking further damage.
2. Clean the Area Thoroughly
Good preparation is essential before you try any repairs. Even the best products won’t work properly if there’s dirt or grit in the way.
Start by giving the area a thorough vacuum. Follow this by wiping the floor with a slightly damp microfiber cloth or an appropriate wood floor cleaner to remove any remaining dirt.
Make sure the floor is completely dry before you begin any repair work. Skipping this step can trap dust or moisture under fillers or finish, leading to a patchy result.
For tips on safe cleaning, read How to Clean Wood Flooring.
3. Fixing Light Surface Scratches
Scratches are a normal part of life, especially in busy homes with pets and children. For marks that haven’t cut into the wood itself, there are straightforward ways to restore the finish.
A colour-matched wood floor scratch cover is an easy solution for fine lines. These are designed to blend seamlessly with your floor’s tone, making the scratch less visible. Wax sticks are another useful option for minor imperfections, filling shallow marks while adding subtle colour.
After applying the scratch cover or wax, gently buff the area with a clean, soft cloth, working along the grain. This helps the repair blend in and smooth out any excess product. Done carefully, this approach can make surface scratches nearly disappear, maintaining the floor’s natural character without major intervention.
4. How to Get Deeper Scratches Out of Hardwood Floors
If the scratch has cut through the finish into the wood, you’ll need to take a more involved approach.
Light sanding is usually the first step. Always work with the grain using fine-grit sandpaper, applying gentle, even pressure to avoid creating dips. Once you’ve smoothed the edges of the scratch, vacuum away any dust and wipe the area clean.
If the scratch has lightened the wood or exposed a different tone, a matching wax stick wood stain can help blend it back in. The different colour wax sticks can be melted and mixed together to get the colour right. Apply carefully, wiping away any excess to avoid dark spots.
This method can be surprisingly effective in making moderate scratches much less noticeable while maintaining the integrity of your floor’s finish.
5. Repairing Deep Gouges
When a scratch is more like a gouge or dent, simple sanding and colouring won’t be enough. These cases require filling to restore a level surface or a plank replacement.
For filling: Choose a high-quality wood filler designed for flooring. Colour matching is important; many fillers come in a range of wood tones, so select the one that best suits your floor. Apply the filler with a putty knife, pressing it firmly into the gouge to ensure full contact and remove any excess. Allow it to cure fully according to the product instructions.
Once dry, sand the area carefully until it’s flush with the surrounding floor. Apply stain if needed to match the colour, then finish with your usual sealant. This process helps ensure the repair isn’t just functional but also visually blends with the rest of the floor.
For a plank replacement: Regardless of whether the floor is fully glued down to the subfloor or floating, a plank replacement is possible. Care is needed to prepare the area in advance of the work being carried out especially in the selection of the new board given it can vary in colour and sheen dependent on how long the existing floor has been installed. See our ‘Plank replacement guide’.
6. Can You Buff Out Scratches on Hardwood Floors?
Even if there aren’t single deep scratches, you might notice fine scuffs, dull patches, or general wear over time. Buffing is a reliable way to restore life to a tired-looking finish and is part of regular care that keeps your floor in top condition. Maintaining a wood floor is easier than you think, and buffing is one of those simple steps that makes a big difference.
For small areas, hand-buffing with a suitable pad can blend minor marks and restore shine. For entire rooms, using a floor buffer evens out the finish, removes fine surface scratches, and helps maintain a consistent appearance.
While buffing doesn’t fix deep damage, it’s an excellent maintenance technique that can delay the need for full sanding and refinishing, saving time and money in the long run.
7. Common Mistakes to Avoid
When caring for your floor, a few simple precautions can save you from costly repairs.
Avoid using harsh or abrasive cleaners not designed for wood floors, they can strip finish and leave marks. Don’t soak your floor with water; excess moisture can damage the wood and finish over time.
Colour matching is crucial when using fillers or pens. Even well-executed repairs can stand out if the colour is wrong, so take time to test and select the right tone.
If you’re advising friends or looking online for how to get scratches out of hardwood floors, remember that quick fixes can sometimes cause more harm than good. Taking a little extra care with preparation and product choice will always give better results.
9. Keeping Your Floor Scratch-Free
Prevention is one of the easiest and most effective ways to protect the beauty of your wood floor. A few thoughtful habits can go a long way in avoiding unwanted marks and wear.
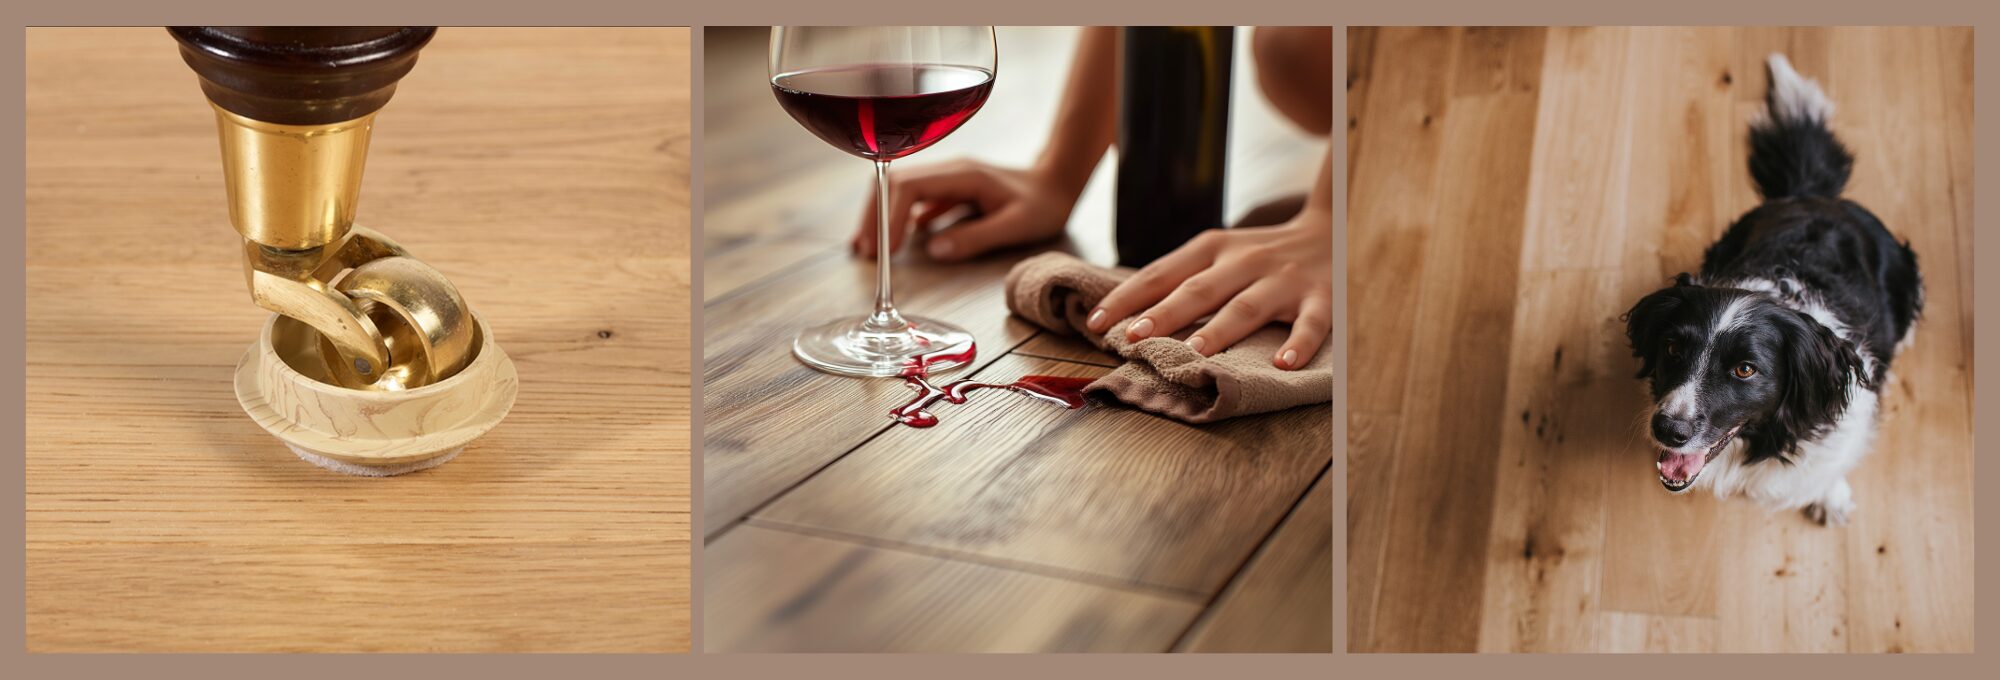
Use entrance mats. These typically remove 80% of the dirt coming in from outside and are effective. Use protective felt pads and caster cups on all furniture to reduce the risk of scratches from daily movement. When it’s time to rearrange, always lift pieces rather than dragging them to avoid scoring the surface. Keeping your pet’s nails trimmed helps minimise scuffs, especially in busy family spaces.
Regular cleaning is just as important. Gentle, frequent maintenance using the Woodpecker Cleaning Kit removes the grit and dirt that can act like sandpaper underfoot, keeping your home looking welcoming and cared for.